 |
|||
|
|
|||
|
|
|||
| ||||||||||
|
|
 TM 9-2835-255-34
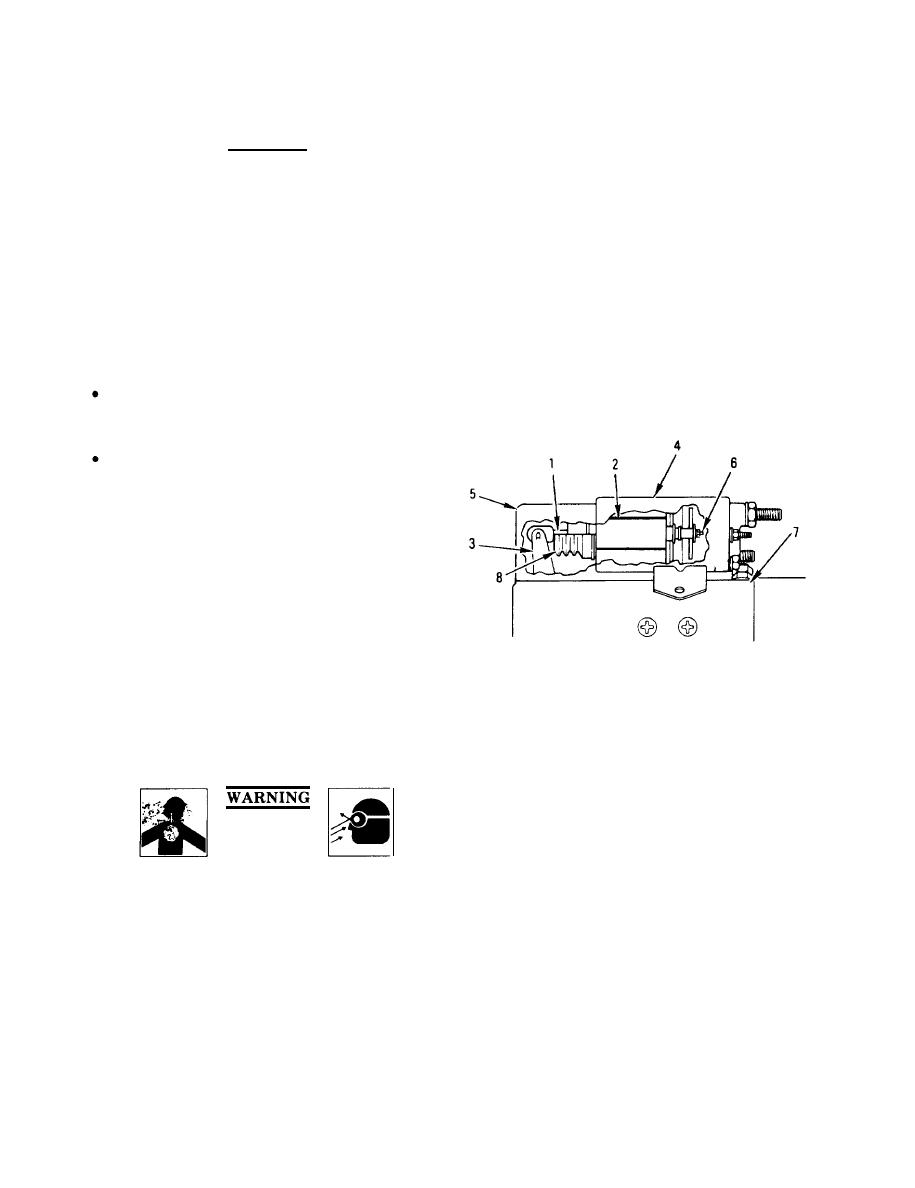
S W I T C H R E P L A C E M E N T ( S h e e t 2 of 3)
STARTER
MOTOR
CAUTION
Sealing compound on threaded end of shaft (1) may
make it necessary to use pliers to unscrew plunger
(2) from shaft (1). Damage may occur to plunger (2),
shaft (1), or arm link (3) if plunger (2) is difficult to
turn. If plunger (2) is damaged, switch (4) must be
replaced.
3. REMOVE SWITCH (4).
a. Pull switch (4) out of shift housing
assembly (5) as far as it will go.
NOTE
Do not loosen plunger and shaft assembly nut (6)
while turning it counterclockwise to unscrew
plunger (2) from shaft (1).
If plunger (2) does not turn when turning nut (6),
do step c.
b. Loosen plunger (2) from shaft (1) by
turning nut (6) counterclockwise.
c. Put rag over plunger (2) and unscrew
plunger (2) from housing (5)
counterclockwise. If shaft (1) comes out of
link (3) instead of unscrewing from
plunger (2), put plunger (2) in capped vise
and unscrew shaft (1).
d. Remove switch (4) from motor (7) by
rocking to loosen plunger (2) from
boot (8).
4. INSPECT PARTS FOR DAMAGE. REPLACE
AS REQUIRED
INSTALLATION:
NOTE
Shaft (1) must be free of dirt, grease, and oil.
1. CLEAN SHAFT (1). USE CLEANING
COMPOUND AND RAG.
Go on to Sheet 3
9-49
|
|
Privacy Statement - Press Release - Copyright Information. - Contact Us |
