 |
|||
|
|
|||
|
|
|||
| ||||||||||
|
|
 TM 9-2815-224-34&P
Fuel Injector Maintenance lnstructions (Cont)
2-3. FUEL INJECTOR REPAIR (CONT).
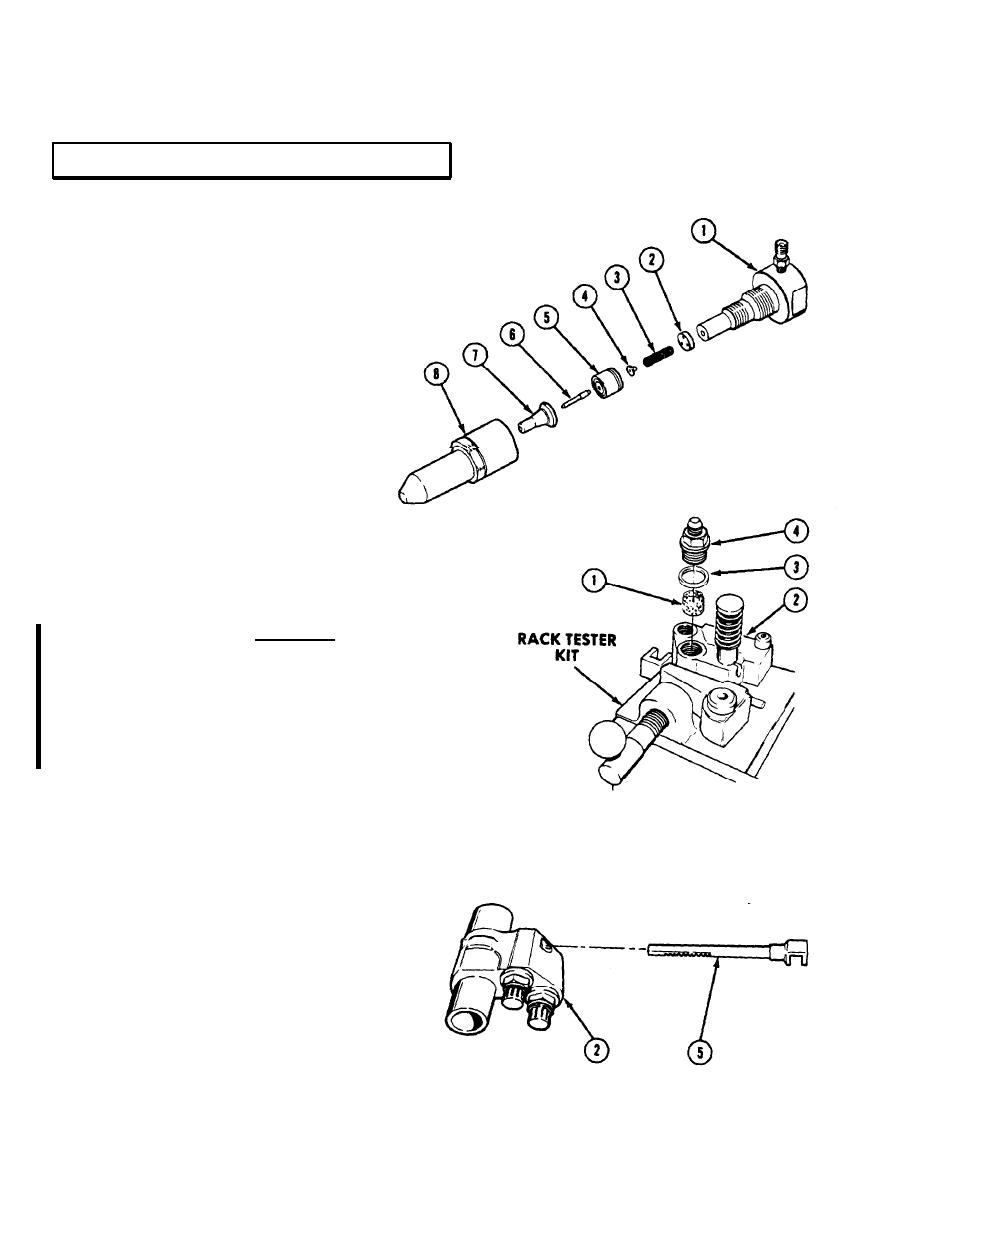
Place adapter (1) in vise.
(24)
Remove injector valve nut (8),
(25)
spray tip (7), needle valve (6),
cage (5), spring seat (4), spring (3),
and check valve cage (2).
e. Assembly
NOTE
Outlet side injector does not have filter.
Insert filter (1), slotted end up, in inlet side fuel
(1)
cavity in top of injector body (2).
Install two gaskets (3) in each of two injector
(2)
caps (4).
Apply injector test oil to thread of injector caps (4)
(3)
and install in injector body (2).
CAUTION
Some injector caps (4) and injector bodies (2) could have a blued
or non-blued finish. These parts are fully interchangeable,
however, to avoid parts damage due to overtightening, the
correct torque values listed below must be used.
(a)
Torque a non-blued injector cap (4) on a non-blued injector
body (2) to 62 lb-ft (84 Nm).
(b)
Torque a blued injector cap (4) on a blued injector body (2)
to 70 lb-ft (95 Nm).
(c)
Torque a non-blued injector cap (4) on a blued injector body (2) or a blued injector ap (4) on a
c
non-blued injector body (2) to 62 lb-ft (84 Nm).
Place injector body (2) in rack tester kit and tighten injector caps (4).
(4)
Purge filter (1) with diesel fuel oil directed through injector caps (4).
(5)
Install clean shipping caps on injector caps (4) to prevent dirt from entering injector body (2).
(6)
Support injector body (2), bottom end up,
(7)
in rack tester kit.
Slide injector rack (5) through injector
(8)
body (2) with teeth of rack pointing
towards center of injector body.
2-16 Change 2
|
|
Privacy Statement - Press Release - Copyright Information. - Contact Us |