 |
|||
|
|
|||
|
|
|||
| ||||||||||
|
|
 TM 9-2815-224-34&P
Cylinder Head Maintenance Instructions
(8)
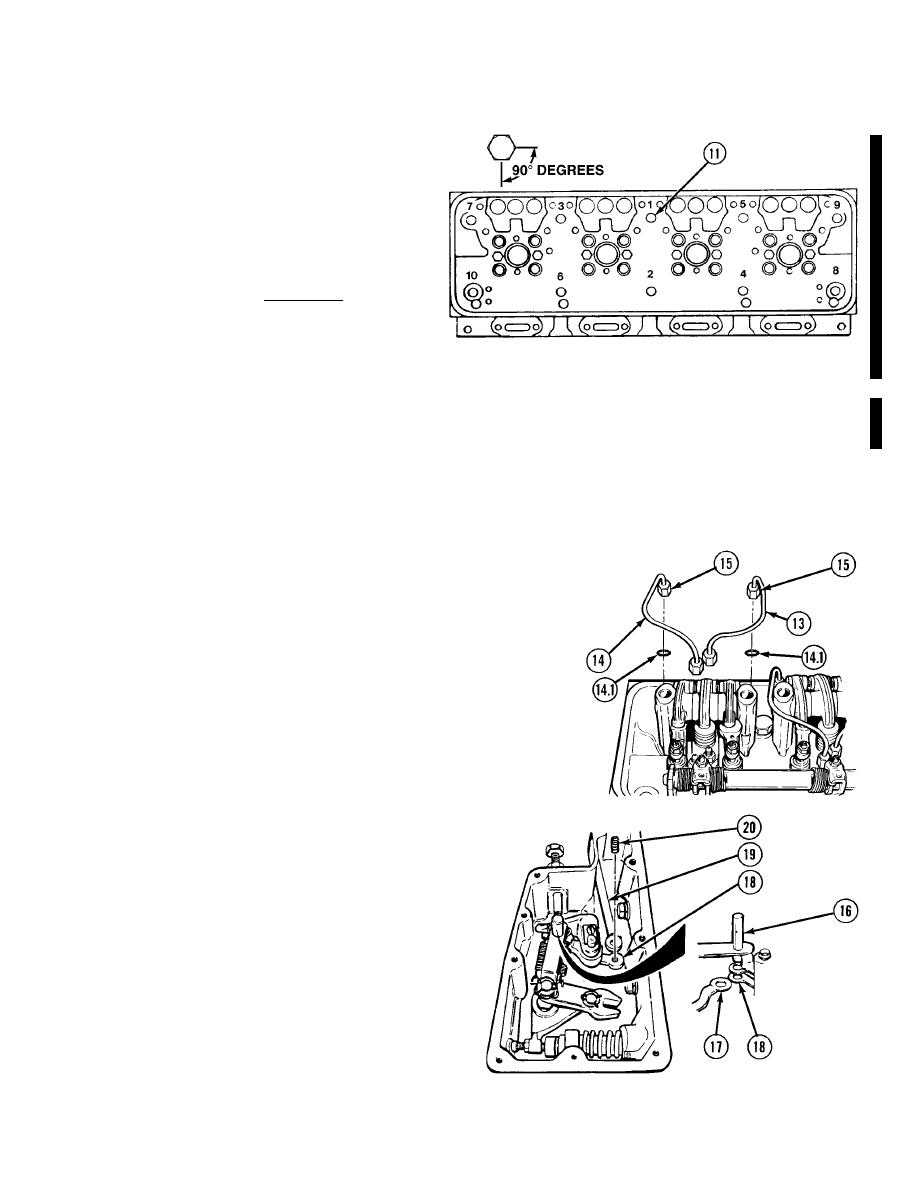
Gradually tighten ten cylinder
head screws (11), in 50 lb-ft (68
NSm) increments, to 150 lb-ft (204
NSm) in the sequence shown.
Hold the wrench at this torque for
2 to 3 seconds to allow bolts to
turn while the compression seals
yield to their crushed thickness.
CAUTION
While performing step (8.1) do
not loosen more than one bolt at
a time. Failure to comply may
cause damage to equipment.
NOTE
For ease in carrying out the procedure below, it may be convenient to premark a
socket with four marks 90 degrees apart. At the start of each turn, mark the head
with a grease pencil at one mark on the socket and turn to the next mark.
(8.1) After completing step (8) perform the following in the same sequence, beginning with cylinder
head screw #1 and continuing one cylinder head screw at a time. Back off cylinder head screw
until loose (at least one-half turn.) Retighten to 100 lb-ft (136 NSm), plus a turn of an additional
90 degrees. Try to turn the cylinder head screw in a single arc with one pull of the wrench.
Then proceed with cylinder head screw #2, etc.
NOTE
O-rings must be installed dry. Do not apply oil.
(9)
Install eight fuel tubes (13 and 14) and
sixteen O-rings (14.1).
(10)
Tighten 16 nuts (15) to 160 lb-in (18.1
NSm) using fuel line nut wrench.
NOTE
Fuel rod is installed through cylinder
head.
Left and right bank fuel rods are installed
differently. Step (11) covers installation of
left bank; step (12) covers installation of
right bank.
(11) Lift connecting pin (16) 3/4-in. (19 mm).
Install left bank fuel rod (17) to control
link operating lever (18).
(12) Install right bank fuel rod (19) to control
link operating lever (18). Install
screw (20).
Change 4
|
|
Privacy Statement - Press Release - Copyright Information. - Contact Us |