 |
|||
|
|
|||
|
|
|||
| ||||||||||
|
|
 TM 9-2815-224-34&P
Piston and Connecting Rod Maintenance Instructions (Cont)
c. Assembly.
NOTE
Be sure to aline all match marks.
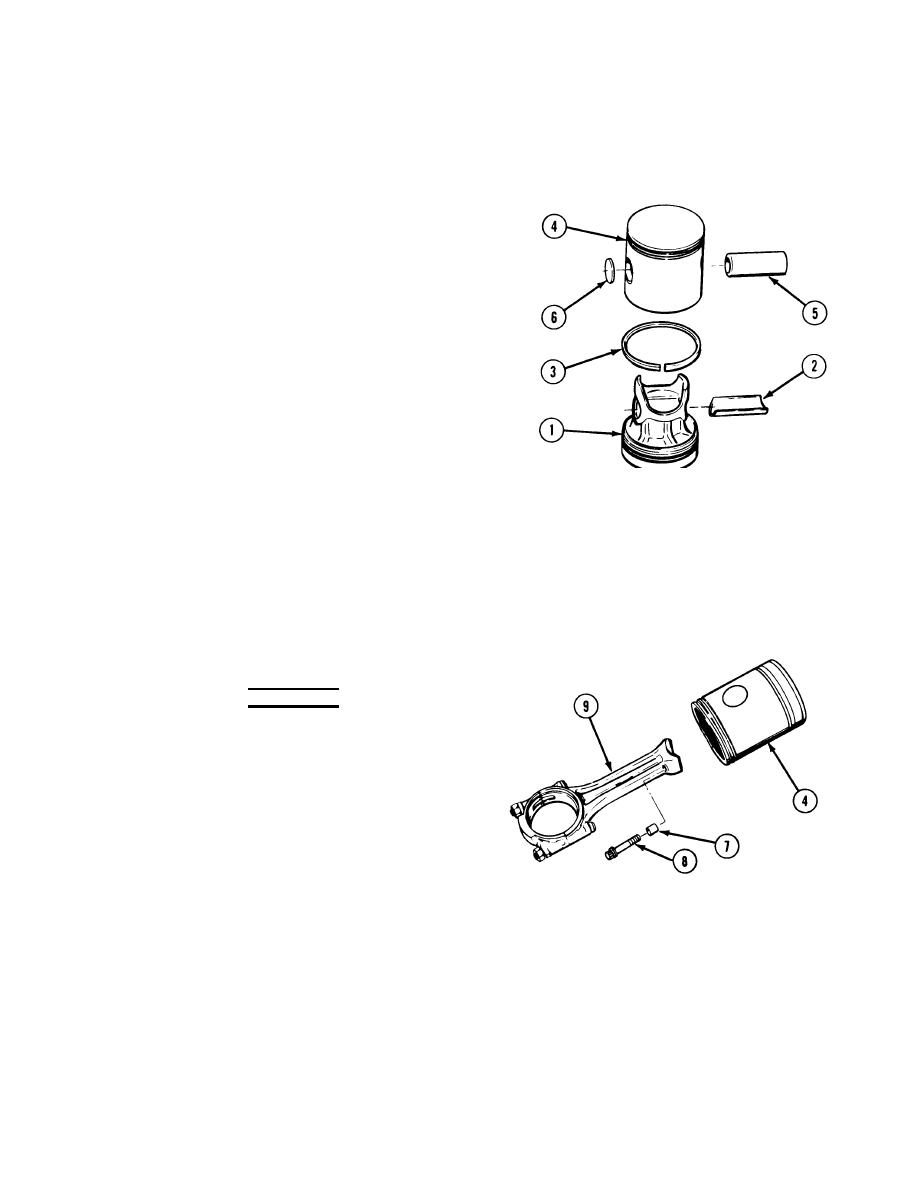
(1) Place piston crown (l), top end down, on work
bench.
(2) Install piston pin bearing (2).
(3) Coat metal seal ring (3) with lubricating oil.
(4) Install metal seal ring (3) on piston crown (1).
Beveled side must face toward bottom of piston
crown (l).
(5) Rotate metal seal ring (3) fully around piston
crown (1) and be sure it turns freely with no
sticking or binding.
(6) Compress metal seal ring (3) and push piston
skirt (4) down into position on piston crown (1).
(7) Hold piston crown (1) and spin piston skirt (4).
Piston skirt (4) must turn freely with no binding.
TA357438
(8) Coat piston pin (5) with lubricating oil.
(9) Line up hole in piston skirt (4) with hole in piston crown (l).
(10) Install piston pin (5) with threaded holes toward bottom of piston skirt (4).
NOTE
Retainers must be seated fully and evenly in piston skirt.
(11) Install piston pin retainers (6) in piston skirt (4) at each side of piston pin (5) using piston pin
retainer tool; install until they bottom out.
(12) Using leak detector, apply 10-in. (254 mm) of vacuum to each piston pin retainer (6). There
should be no loss of pressure.
(13) Install two spacers (7) on two screws (8).
WARNING
Adhesives, solvents, and sealing compounds
can burn easily, can give off harmful vapors,
and are harmful to skin and clothing. To
avoid injury or death, keep away from open
fire and use in well-ventilated area. If
adhesive, solvent, or sealing compound gets
on skin or clothing, wash immediately with
soap and water.
(14) Apply small amount of international No. 2
TA357439
compound to threads and head contact
surface of two screws (8).
(15) Insert connecting rod (9) into piston skirt (4).
(16) Install screws (8) and tighten finger tight.
(17) Clamp connecting rod (9) in vise with soft jaws.
(18) Tighten screws (8) to 55 to 60 lb-ft (75 to 81 Nm).
6-11
|
|
Privacy Statement - Press Release - Copyright Information. - Contact Us |
