 |
|||
|
|
|||
|
Page Title:
COMPUTER AND TRAINER SHELTER FLOURESCENT LAMPS REPLACEMENT |
|
||
| ||||||||||
|
|
 TM 9-6920-737-10
COMPUTER AND TRAINER SHELTER FLOURESCENT LAMPS REPLACEMENT
WARNING
Glass from broken fluorescent lamps can cause severe cuts or eye injuries. Use caution to prevent lamp breakage
whenever a light fixture diffuser has been removed or when handling the fluorescent lamps.
1.
Get screwdriver (item 5, Section III Appendix B).
2.
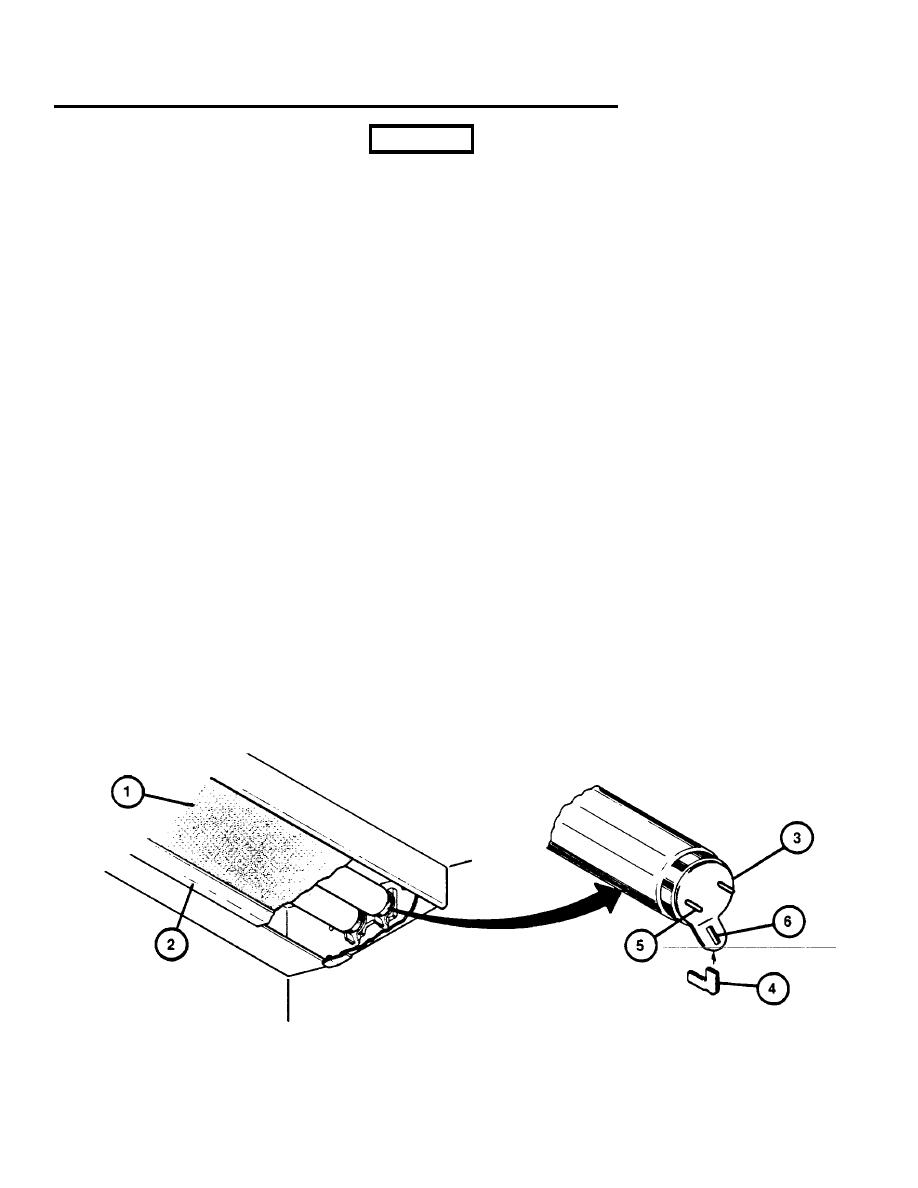
Push up translucent plastic diffuser (1) and hinged flap (2) along face of fluorescent fixture.
3.
While holding up hinged flap (2) use screwdriver (item 5, Section III, Appendix B) to carefully release plastic
diffuser
(1) from face of fluorescent fixture and set aside for later reinstallation.
4.
Locate red fiber tab (3) and gray fiber (4) key at each end of fluorescent lamp to be replaced.
5.
While pressing red fiber tab to release gray fiber key, pull down and remove key. Set key aside for later
reinstallation.
6.
Repeat step five at opposite end of fluorescent lamp.
7.
Roll lamp 90" and pull down carefully to release lamp from fixture. Remove red fiber tabs from each end of lamp
and set aside for later reinstallation. Then discard lamp.
8.
Obtain replacement lamp (item 5, Section III, Appendix B) and reinstall red fiber tabs at each end of lamp.
9.
Hold lamp horizontally below fixture with connector pins (5) aligned vertically and red fiber tabs pointing to one
side.
10. Push lamp up into fixture connectors, then roll lamp 900 so that red tabs installed on each end point down and
lamp is locked in place.
11.
Reinstall both fiber keys removed in step 5 by inserting narrow ends through slots (6) in red fiber tabs.
12.
Reinstall plastic diffuser by inserting one edge above upper lip on fixture, then raising other edge above hinged flap
until the flap falls back to hold diffuser in fixture.
3-21
|
|
Privacy Statement - Press Release - Copyright Information. - Contact Us |