 |
|||
|
|
|||
|
|
|||
| ||||||||||
|
|
 TM 9-2835-255-34
STARTER MOTOR REPAIR (Sheet 9 of 12)
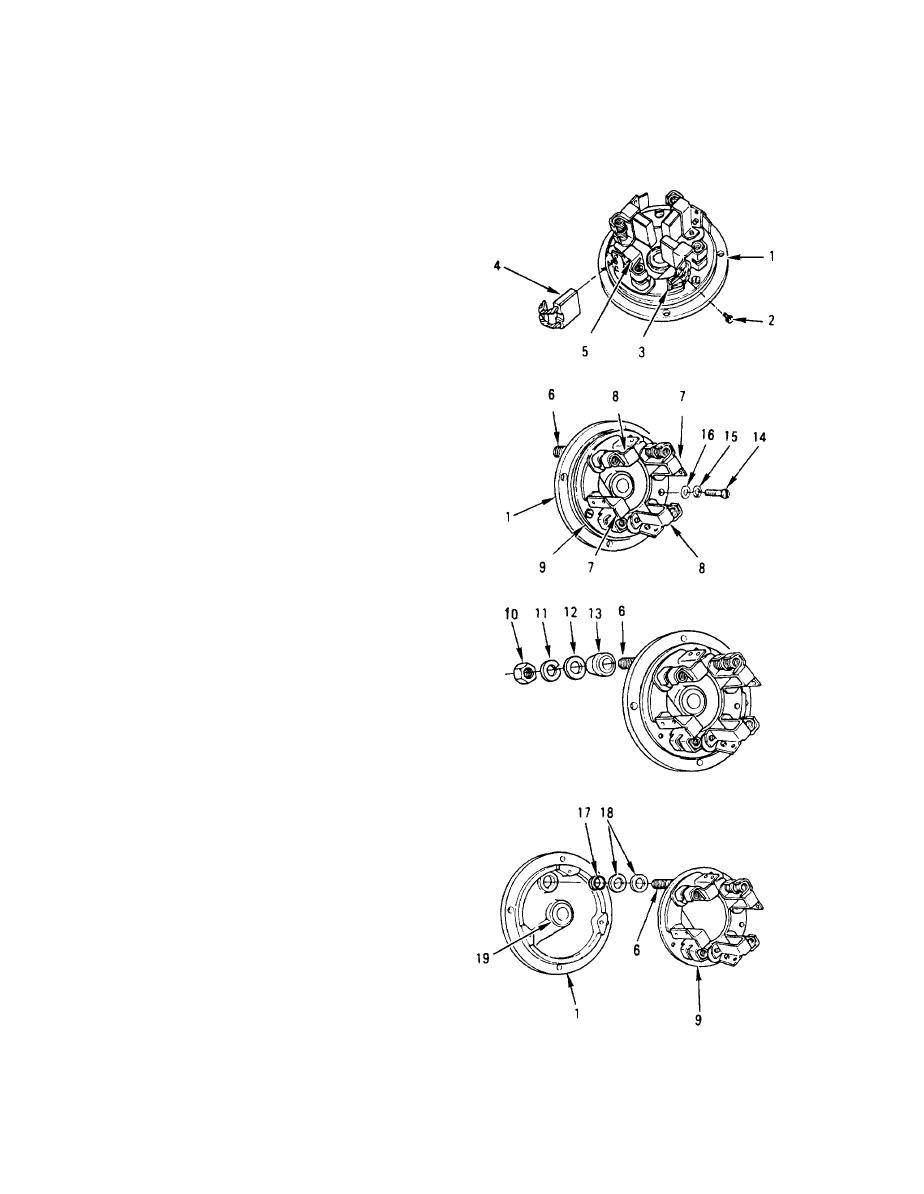
20, PUT END BELL (1) IN VISE. REMOVE
FOUR SCREWS (2) FROM BRUSH LEADS
[3). PULL FOUR BRUSHES (4) OUT OF
BRUSH HOLDERS (5).
21. SET MULTIMETER TO RX1000 SCALE
AND CHECK CONTINUITY BETWEEN
TERMINAL STUD (6) AND TWO
INSULATED BRUSH HOLDERS (7). IF
MULTIMETER READS LESS THAN
INFINITY FOR EITHER CHECK, SKIP
STEP 22.
22. SET MULTIMETER TO RX1 SCALE.
CHECK CONTINUITY BETWEEN STUD (6)
AND TWO GROUND BRUSH HOLDERS (8).
IF MULTIMETER READS 10 OHMS OR
LESS, GO TO STEP 28.
23. SEPARATE HOLDER ASSEMBLY (9) AND
END BELL (1).
a. Remove nut (10), lockwasher (11), washer
(12), and insulator (13) from stud (6).
b. Remove three screws (14), lockwashers
(15), and washers (16) from holder (9).
Tap stud (6) until holder (9) separates
from end bell (1).
24. PULL PREFORMED PACKING (17) AND
TWO WASHERS (18) FROM STUD (6).
REMOVE HOLDER (9).
25. INSPECT END BELL (1) FOR CRACKS OR
BREAKS. INSPECT BUSHING (19) FOR
CRACKS, BREAKS, OR SCORE MARKS.
REPLACE AS REQUIRED.
26. INSTALL TWO NEW WASHERS (18) AND
NEW PACKING (17) ON HOLDER (9) AND
END BELL (1)
a. Put washers (18) and packing (17) on stud
(6) of holder (9).
b, Apply sealing compound to back of holder
(9).
c. Aline holder (9) with end bell (1). Install
three screws (14), new lockwashers (15),
and washers (16).
27. INSTALL NUT (10), NEW LOCKWASHER
(11), WASHER (12), AND NEW
INSULATOR (13) ON STUD (6).
Go on to Sheet 10
9-36
|
|
Privacy Statement - Press Release - Copyright Information. - Contact Us |
