 |
|||
|
|
|||
|
Page Title:
ASME-A Pressure Feed, MATERIAL TANKS |
|
||
| ||||||||||
|
|
 ASME-A Pressure Feed
OPERATING INSTRUCTIONS and
MATERIAL TANKS
REPLACEMENT PARTS
1. CLEAN OUT TANK and blow out all hose before
using. Always use hose of ample size.
2. MATERIAL TO BE USED must be thoroughly
mixed and strained through a fine mesh strainer
or cheesecloth before or while pouring into tank.
Follow material manufacturers instructions
regarding proper type and amount of thinner to
be used.
3. When using the Airmotor Agitator do not fill tank
over the required amount, 3/4 Full .This is to
prevent paint from entering the Agitator
4. PLACE COVER ON TANK. Turn each clamp
down until it touches the cover. Proceed around
the cover, turning each clamp one full turn until
all are tight. This method insures longer gasket
life and uniform sealing.
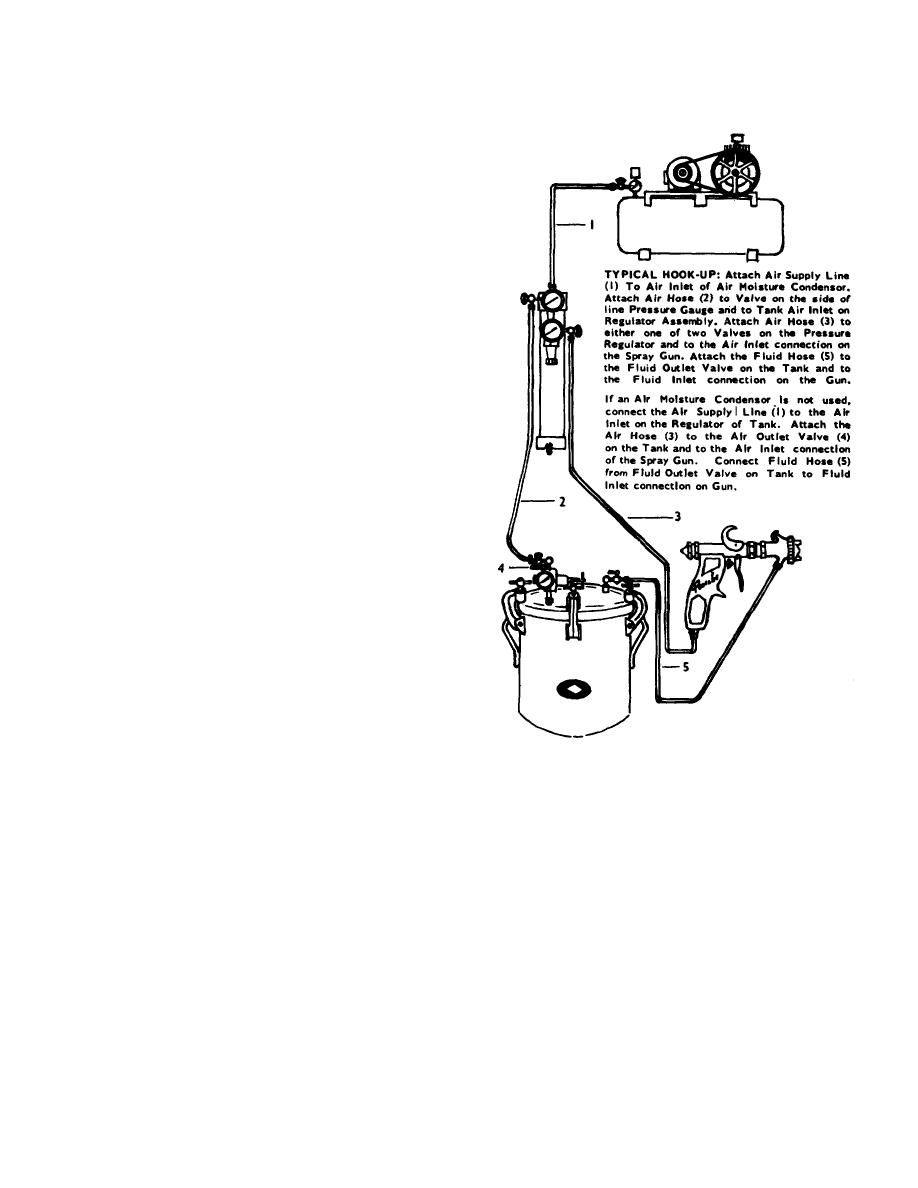
5. FOLLOW HOOK-UP INSTRUCTIONS AT
RIGHT.
6. OPEN AIR LINE VALVE on Air Regulator and
Moisture Condensor Unit to allow air pressure to
enter tank.
7. ADJUST AIR PRESSURE for material by
turning the adjusting handle on the tank
regulator
until
the
gauge
indicates
approximately 5 lbs. When it is necessary to
decrease pressure in the tank, the excess
pressure must first be released by opening the
release valve.
a. CAUTION: Release valve should be opened
before removing filler plug or cover.
8. PROPER FLUID PRESSURE will vary from 2
lbs. upward, depending upon the consistency of
the material and the height to which fluid must
be raised.
CARE AND CLEANING
9. FLUID PRESSURE should be adjusted to give a
1. Tank should be kept in upright position to keep
uniform flow. Use lowest pressure that gives
liquids and materials away from inside part of
satisfactory results.
Cover, Air Passales Must Stay Clean.
10. TO CLEAN HOOK-UP, Remove all pressure
2. PU 566 Splash Cap on Regulator Air Outlet
from the tank by opening the release valve.
inside Tank Cover should be inspected
Then force material back into the tank by
periodically to make sure Air Ports are open to
loosening the air cap of the gun, holding a wad
admit Airpressure entering Tank.
of cloth over the air cap and pulling the trigger.
3. U8II Air Inlet Strainer in Tank should be
Air thus diverted into the fluid lines forces
Cleaned periodically to remove any skins or
material back into the container.
Remove
heavy particles which might clog the openings.
material from the tank and replace with clean
The same applies to the Spray Gun and Tank
solvent. Apply pressure again to the tank and
Regulator.
spray solvent through the gun to flush out the
MATERIAL:
fluid passages and hose. Wipe off equipment
Fluid material should be mixed to consistency
with a solvent soaked rag.
recommended by manufacturer and should always be
11. NEVER ALLOW SAFETY VALVE TO BECOME
strained through a lint free cloth or metal screen before
COVERED WITH PAINT.
using.
3
|
|
Privacy Statement - Press Release - Copyright Information. - Contact Us |