 |
|||
|
|
|||
|
|
|||
| ||||||||||
|
|
 TM 9-2520-270-34
41. COAT ALL PARTS WITH
TRANSMISSION OIL.
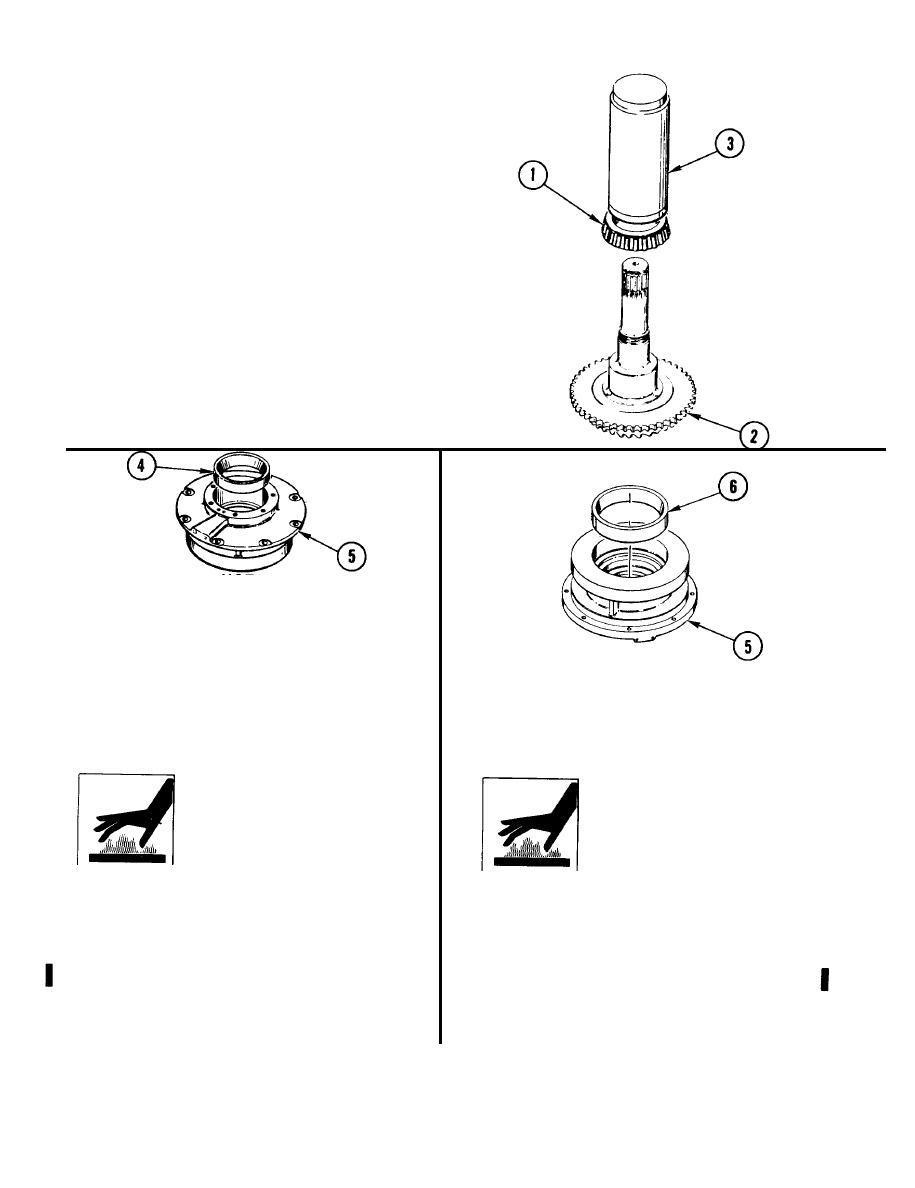
42. IF INNER CONE AND ROLLERS (1)
WERE REMOVED, GO TO STEP 43.
IF NOT, GO TO STEP 44.
43. INSTALL NEW CONE AND
ROLLERS (1).
a.
Set up gear assembly (2) in
arbor press.
b.
Using bearing installer (3), press on
new cone and rollers (1) large end first.
c.
Fully seat cone and rollers (1) on
gear assembly (2).
NOTE
If both cups were removed, steps 44 and 46
can be performed at same time. Housing
assembly can be tipped on its side to hold
cups in place while warming.
44. IF OUTER CUP (4) WAS REMOVED,
46. IF INNER CUP (6) WAS REMOVED,
GO TO STEP 45. IF NOT, GO
GO TO STEP 47. IF NOT, GO TO
TO STEP 46.
STEP 48.
WARNING
WARNING
Do not handle hot or cold parts
Do not handle hot or cold parts
without protective gloves.
without protective gloves.
Personnel can be iniured.
Personnel can be injured.
45. INSTALL NEW CUP (4).
47. INSTALL NEW CUP (6).
a. Pack new cup (4) in dry ice for two
a.
Pack new cup (6) in dry ice for two
hours.
hours.
b. Using gloves, fully seat new
b.
Using gloves, fully seat new
cup (4) in housing assembly (5),
cup (6) in housing assembly (5),
thick end first.
thick end first.
c . Let parts return to room temperature.
c.
Let parts return to room temperature.
4-134
Change 1
|
|
Privacy Statement - Press Release - Copyright Information. - Contact Us |