 |
|||
|
|
|||
|
|
|||
| ||||||||||
|
|
 TM 9-2520-270-34
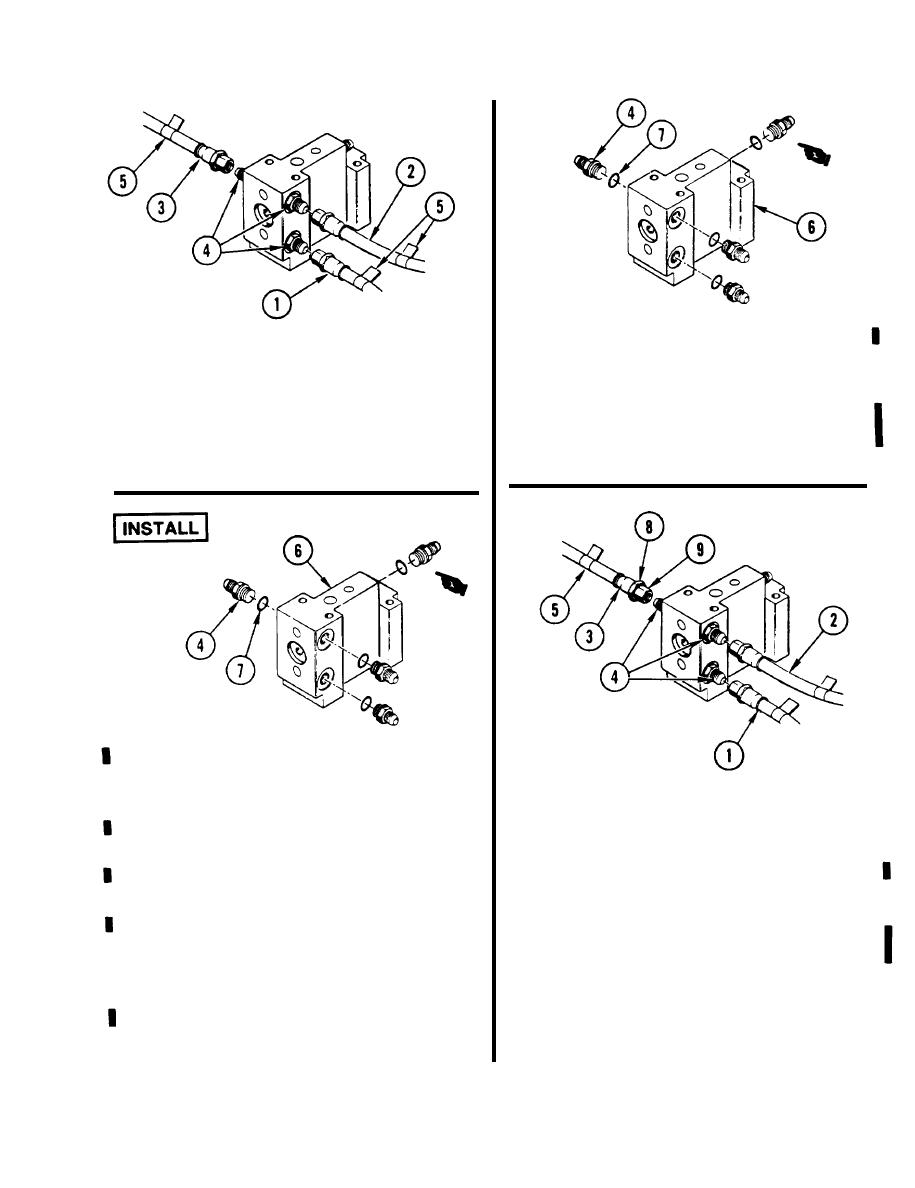
1 6 . REMOVE FOUR ADAPTERS (4) FROM
15. DISCONNECT HOSE ASSEMBLIES
VALVE ASSEMBLY (6).
11629168-10 (1), 11629168-1 (2), AND
a. Place valve assembly (6) in vise.
11629168-3 (3) FROM ADAPTERS (4).
b. Remove four adapters (4).
a. Place identification tags (5) on hose
assemblies (1), (2), and (3).
c. Remove and discard four preformed
packings (7).
b. Disconnect hose assemblies.
17. INSTALL FOUR ADAPTERS (4) IN VALVE
ASSEMBLY (6).
19. CONNECT HOSE ASSEMBLIES
a. Place valve assembly (6) in vise.
11629168-10 (1), 11629168-1 (2), AND
b. Coat four new preformed packings (7)
11629168-3 (3) TO ADAPTERS (4).
with transmission oil.
a. Using identification tags (5) for position,
connect swivel nuts (9) to adapters (4).
c. Install packing (7) on each of four
adapters (4).
b. Remove identification tags (5).
d. Install four adapters (4) in valve
assembly (6).
19.1 USING OPEN-END WRENCH, HOLD
HOSE NUTS (8).
18. USING 3/8-lNCH DRIVE TORQUE
WRENCH AND 9/16-INCH CROWFOOT,
20. USING 3/8-lNCH DRIVE TORQUE
TORQUE FOUR ADAPTERS (4) TO
WRENCH AND 9/16-lNCH CROWFOOT,
125-135 in-lb (144-155 cmkg).
TORQUE THREE SWIVEL NUTS (9) TO
125-135 in-lb (144-155 cmkg).
a. Remove valve assembly (6) from vise.
GO TO NEXT PAGE
4-21
Change 3
|
|
Privacy Statement - Press Release - Copyright Information. - Contact Us |