 |
|||
|
|
|||
|
|
|||
| ||||||||||
|
|
 TM 9-2835-255-34
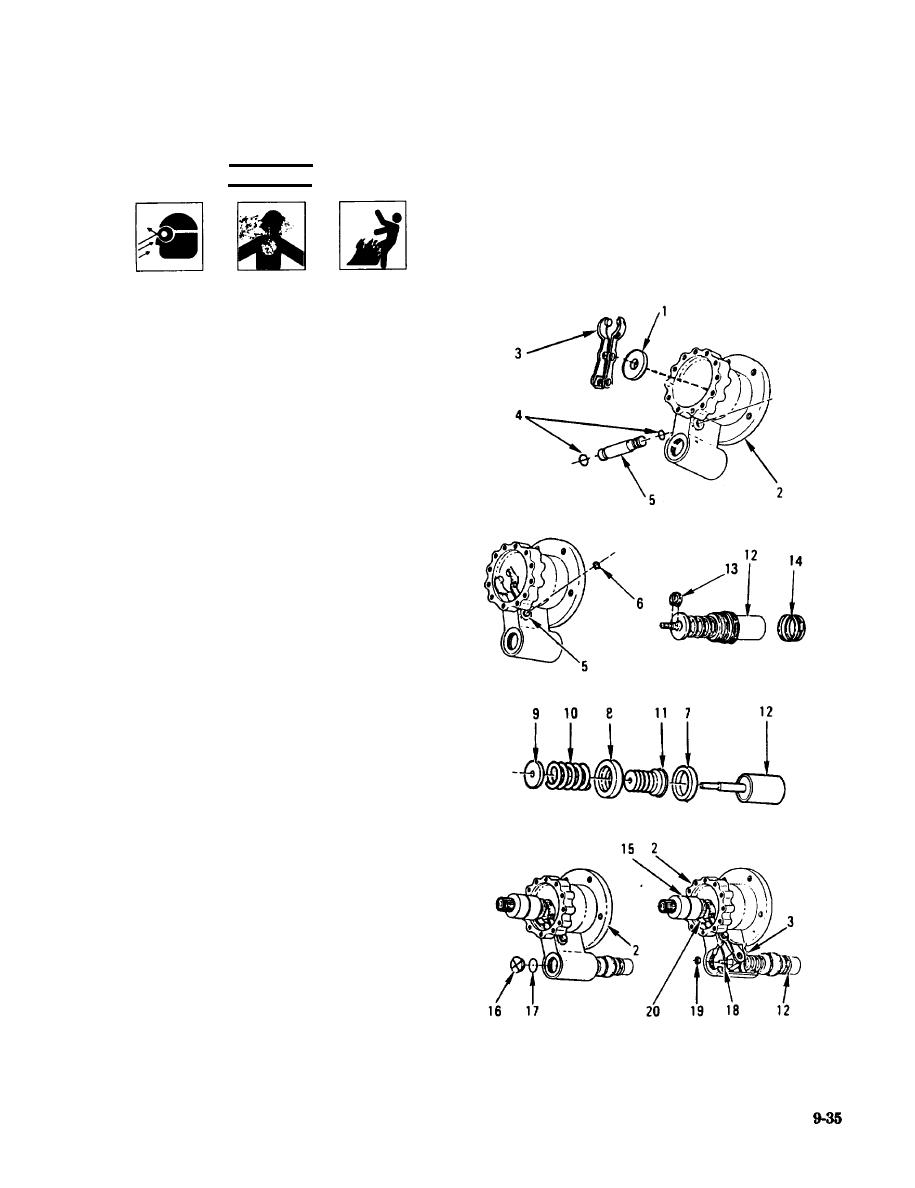
S T A R T E R M O T O R R E P A I R ( S h e e t 8 of 1 2
WARNING
16. REMOVE FIBER WASHER (1) FROM
HOUSING (2) AND CLEAN HOUSING (2)
AND WASHER (1) WITH SOLVENT AND
RAG.
17. INSTALL WASHER (1), LEVER (3), TWO
NEW PACKINGS (4), AND SHAFT (5).
a. Apply adhesive on back of washer (1).
Put washer (1) in housing (2).
b. Put lever (3) in housing (2).
c. Coat packings (4) with grease. Put
packings (4) on shaft (5). Put shaft (5)
through housing (2) and lever (3).
d. Put new retaining ring (6) on shaft (5).
18. INSTALL WASHERS (7, 8, 9), SPRING (10),
AND BOOT (11).
a. Install washer (7), boot (11), washer (8),
spring (10), and washer (9) on plunger
(12).
b. Install new retaining ring (13) on plunger
(12).
c. Loosely install new clamp (14) on plunger
(12) where boot (11) overlaps plunger (12).
19 INSTALL PLUNGER (12), DRIVE (15),
PLUG (16), AND NEW PACKING (17) IN
HOUSING (2).
a. Put plunger shaft (18) in housing (2) and
through lever (3).
b. Install new nut (19) on threads of
shaft (18).
c. Pull lever ears (20) to front of housing
(2). Put grease on ears (20). Put drive (15)
between ears (20).
d. Push drive (15) in housing (2). Put
packing (17) on plug (16). Install plug (16)
on housing (2).
Go on to Sheet 9
|
|
Privacy Statement - Press Release - Copyright Information. - Contact Us |
