 |
|||
|
|
|||
|
|
|||
| ||||||||||
|
|
 TM 9-2835-255-34
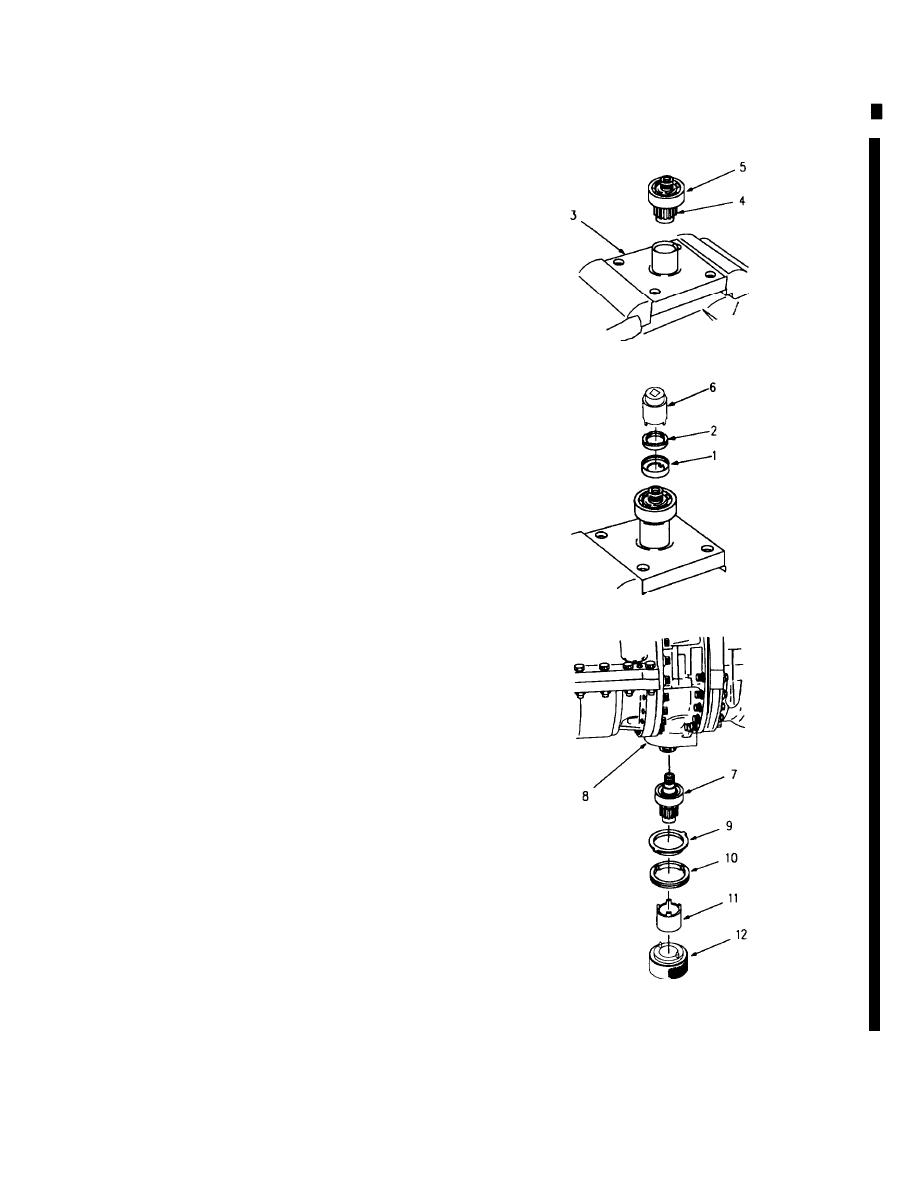
NO. 12 BEARING AND SPLINED COUPLING REPLACEMENT (Sheet 6 of 7)
2. INSTALL NEW LOCKING CUP (1) AND NUT (2).
TIGHTEN NUT (2) BETWEEN 230-250 LB-IN
(25-28 NM) TORQUE. BEND LOCKING CUP (1)
INTO NUT (2) IN TWO PLACES. DO NOT SHEAR
LOCKING CUP
a.
Secure holding fixture (3) in vise or on work
surface. Place splined coupling (4), with No.
12 bearing (5) installed, in holding fixture (3).
b.
Install new locking cup (1) and nut (2). Using
wrench (6) tighten nut (2) between 230-250
lb-in (25-28 Nm) torque. Bend locking cup
(1) into nut (2) in two places. Replace locking
cup (1) if it shears or cracks.
NOTE
It may be necessary to tap bearing and
coupling package with rubber mallet to
seat.
3. INSTALL BEARING AND COUPLING PACKAGE
(7) IN INTERMEDIATE HOUSING (8) AND INSTALL
NEW KEY WASHER (9) AND NUT (10). TIGHTEN
NUT (10) BETWEEN 380-400 LB-IN (43-45 NM)
TORQUE. BEND KEY WASHER (9) INTO NUT (10) IN
TWO PLACES. DO NOT SHEAR KEY WASHER.
a.
Install bearing and coupling package (7) in
intermediate housing (8). Tap with rubber
hammer if necessary to seat. Install new key
washer (9) and nut (10).
b.
Using wrench (11), tighten nut (10) between
380-400 lb-in (43-45 Nm) torque. Mark
housing (8) to align crimping tool (12) with
slots of nut. Using crimping tool (12), crimp
key washer (9) into nut (10) in two places. Re-
place key washer (9) if it shears or cracks.
LE5526
Go on to Sheet 7
5-129
Change 6
|
|
Privacy Statement - Press Release - Copyright Information. - Contact Us |
