 |
|||
|
|
|||
|
Page Title:
IGV BELLCRANK SPRING PIN REPLACEMENT (Sheet 1 of 2) |
|
||
| ||||||||||
|
|
 TM 9-2835-255-34
IGV BELLCRANK SPRING PIN REPLACEMENT (Sheet 1 of 2)
TOOLS: General mechanic's tool kit: automotive (SC 5180-90-N26)
Drive pin punch, 3/32-inch (Item 102, Appendix D)
SUPPLIES: Cotter pin (Item 114, Appendix E)
Spring pin (Item 113, Appendix E)
REMOVAL:
NOTE
Try steps 1 thru 6 first to remove spring pin (l). If
pin (1) cannot be removed go to step 7.
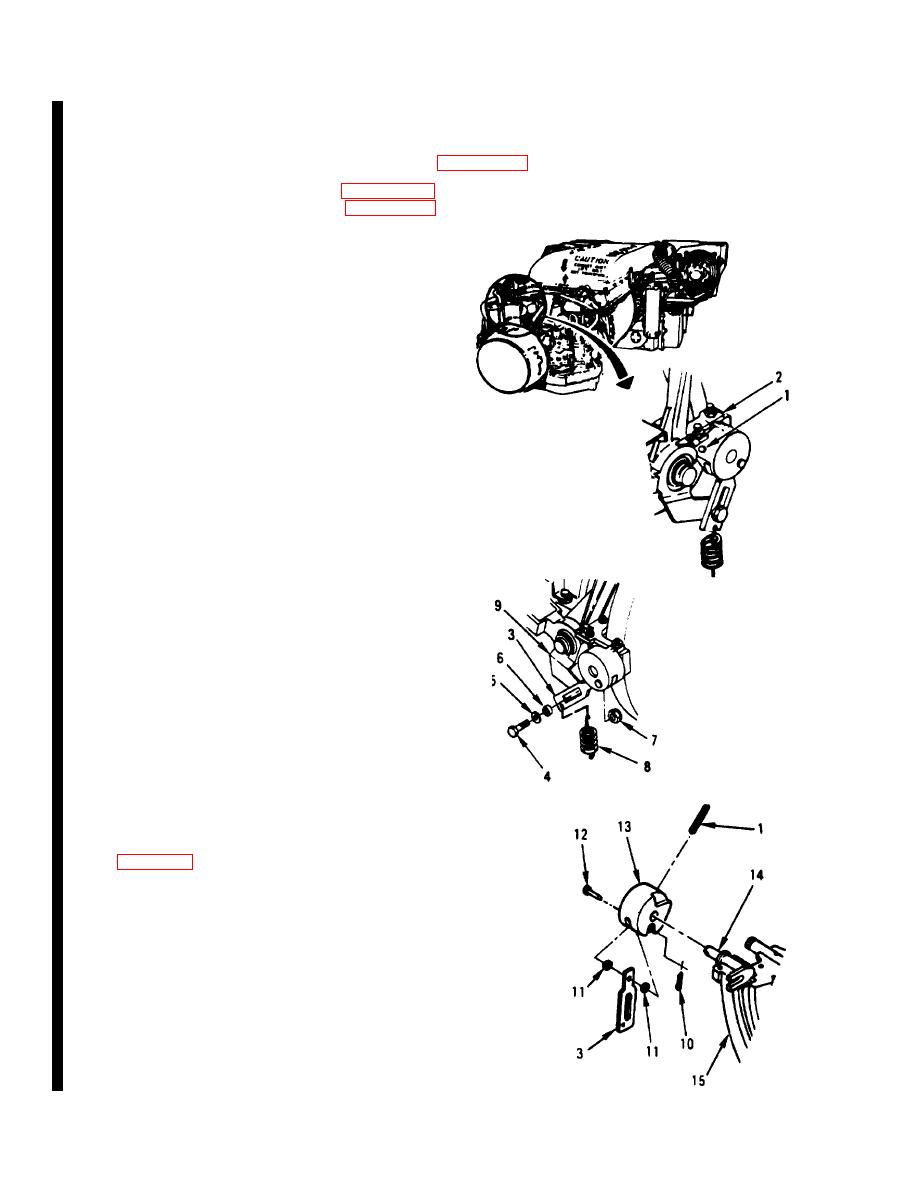
1.
REMOVE SCREEN ASSEMBLY (ENGINE
AIR INLET) (TM 20-1).
2.
REMOVE TUBE ASSEMBLY (NUMBER 1
BEARING FEED) (TM 20-1).
3.
REMOVE INLET GUIDE VANE
ACTUATING CYLINDER (TM 20-1).
4.
REMOVE IGV STOP BRACKET (2).
5.
REMOVE CONNECTING LINK (3).
a. Remove screw (4), washer (5), spacer (6),
nut (7), and spring (8) from link (3) and
lever assembly (9).
b. Remove cotter pin (10), two washers (11),
and pin (12).
c. Remove link (3).
NOTE
If pin (1) is exposed more than l/4-inch, remove
with diagonal pliers. If not, use 3/32-inch punch
and hammer.
6.
REMOVE PIN (1) FROM BELLCRANK (13)
AND SHAFT ASSEMBLY (14). GO TO
STEP 10.
7.
REMOVE INTERMEDIATE (LOW
PRESSURE) HOUSING (TOP HALF)
REMOVE BELLCRANK (13) AND SHAFT
8.
(14) FROM LOWER HOUSING (15).
REMOVE PIN (1) FROM BELLCRANK (13)
9.
AND SHAFT (14).
10. INSPECT PARTS FOR DAMAGE. REPLACE
AS REQUIRED.
Go on to Sheet 2
Change 1
5-32
|
|
Privacy Statement - Press Release - Copyright Information. - Contact Us |
