 |
|||
|
|
|||
|
|
|||
| ||||||||||
|
|
 TM 9-2815-224-34&P
Oil System Maintenance Instructions (Cont)
c. C l e a n i n g / l n s p e c t i o n .
WARNING
Adhesives, solvents, and sealing compounds can burn easily, can give off harmful
vapors, and are harmful to skin and clothing. To avoid injury or death, keep away
from open fire and use in well-ventilated area. If adhesive, solvent, or sealing
compound gets on skin or clothing, wash immediately with soap and water.
(1) Clean metal parts of valve with dry cleaning solvent.
WARNING
Compressed air used for cleaning purposes will not exceed 30 psi (207 kPa). Use
only with effective chip guarding and personal protective equipment
(goggles/shield, gloves etc.).
(2)
Dry valve with compressed air.
(3)
Clean gasket material from mounting surface of valve, oil pump, and cylinder block.
(4)
Inspect all parts for damage. Replace damaged parts.
(5)
Make sure relief valve moves freely in valve body.
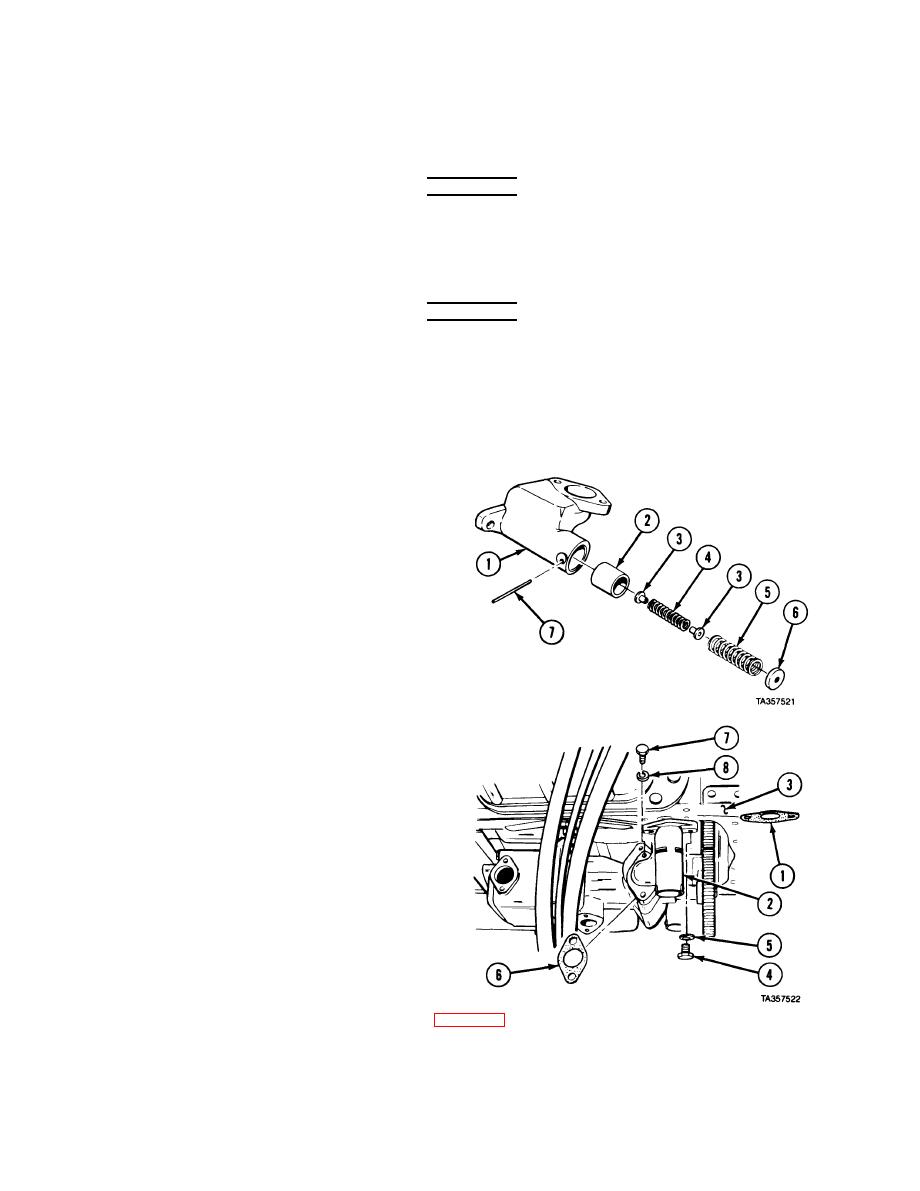
d . Assembly.
(1) Mount-valve body (1) in vise with
soft jaws.
(2) Apply lubricating oil to valve (2).
Install valve, closed end first, into
valve body (1).
(3) Install two end caps (3) on inner
spring (4). Insert inner spring (4)
into valve body (1).
(4) Insert spring (5) over inner
spring (4) into valve body (1).
(5) Install spring seat (6) closed end
first, into valve body (1).
(6) Soldier A compresses spring (5)
while Soldier B installs pin (7).
e . Installation.
(1) Install gasket (1) and pressure relief
valve (2) on engine (3).
(2) Install two screws (4) and
lockwashers (5). Turn screws three or
four turns only.
(3) Install gasket (6) under pressure relief
valve (2).
(4) Install two screws (7) and
lockwashers (8).
(5) Tighten screws (4 and 7) to 30 to
35 lb-ft (41 to 47 NZm).
END OF TASK
8-19
|
|
Privacy Statement - Press Release - Copyright Information. - Contact Us |
