 |
|||
|
|
|||
|
Page Title:
FLEXPLATE REMOVAL/INSTALLATION-continued |
|
||
| ||||||||||
|
|
 Flexplate and Flywheel Housing Maintenance Instructions (Cent)
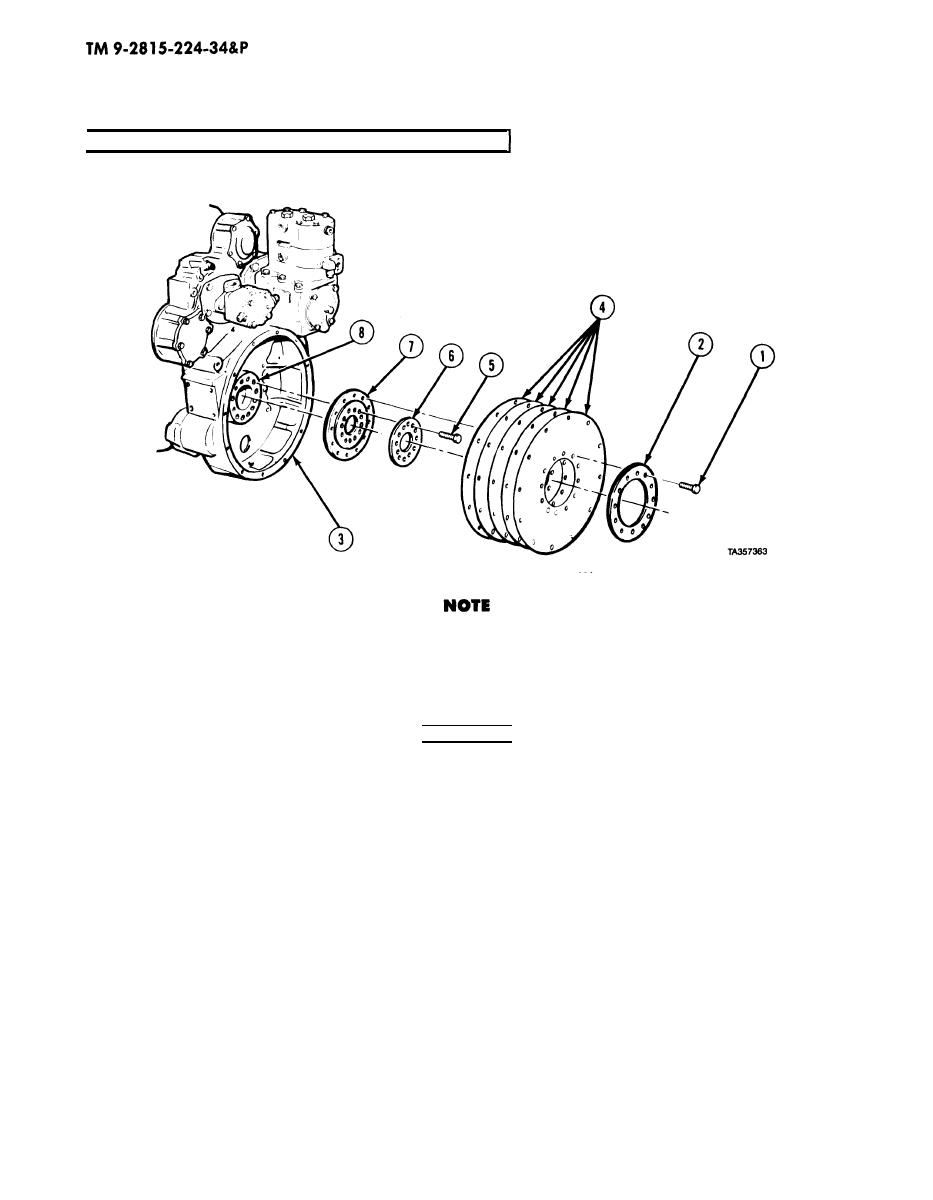
5-2. FLEXPLATE REMOVAL/INSTALLATION (CONT).
a. Removal.
(1) Remove 12 screws (1) and plate (2), from flywheel housing (3).
Mark flexplate disks for proper installation.
(2) Remove five disks (4) from flywheel housing (3).
(3) Remove 12 screws (5), plate (6), and hub (7) from crankshaft (8).
b. Installation.
(1) Aline screw holes in hub (7) with crankshaft (8) in flywheel housing (3).
WARNING
Adhesives, solvents, and sealing compounds can burn easily, can give off harmful
vapors, and are harmful to skin and clothing. To avoid injury or death, keep away
from open fire and use in well-ventilated area. If adhesive, solvent, or sealing
compound gets on skin or clothing, wash immediately with soap and water.
(2) Apply international No. 2 compound to 12 screws (5).
(3) With rough side toward engine, install hub (7), plate (6), and 12 screws (5). Tighten screws to
50 lb-ft (67 N-m) and an additional 1/4 turn.
(4) Apply international No. 2 compound to 12 screws (l).
(5) Aline screw holes in five disks (4) and plate (2) with hub (7).
(6) Install five disks (4), plate (2), and 12 screws (l). Tighten screws to 100 lb-ft (135 N-m).
c. Follow-on Maintenance. Install transmission (TM 9-2320-279-34).
END OF TASK
5-2
|
|
Privacy Statement - Press Release - Copyright Information. - Contact Us |
