 |
|||
|
|
|||
|
Page Title:
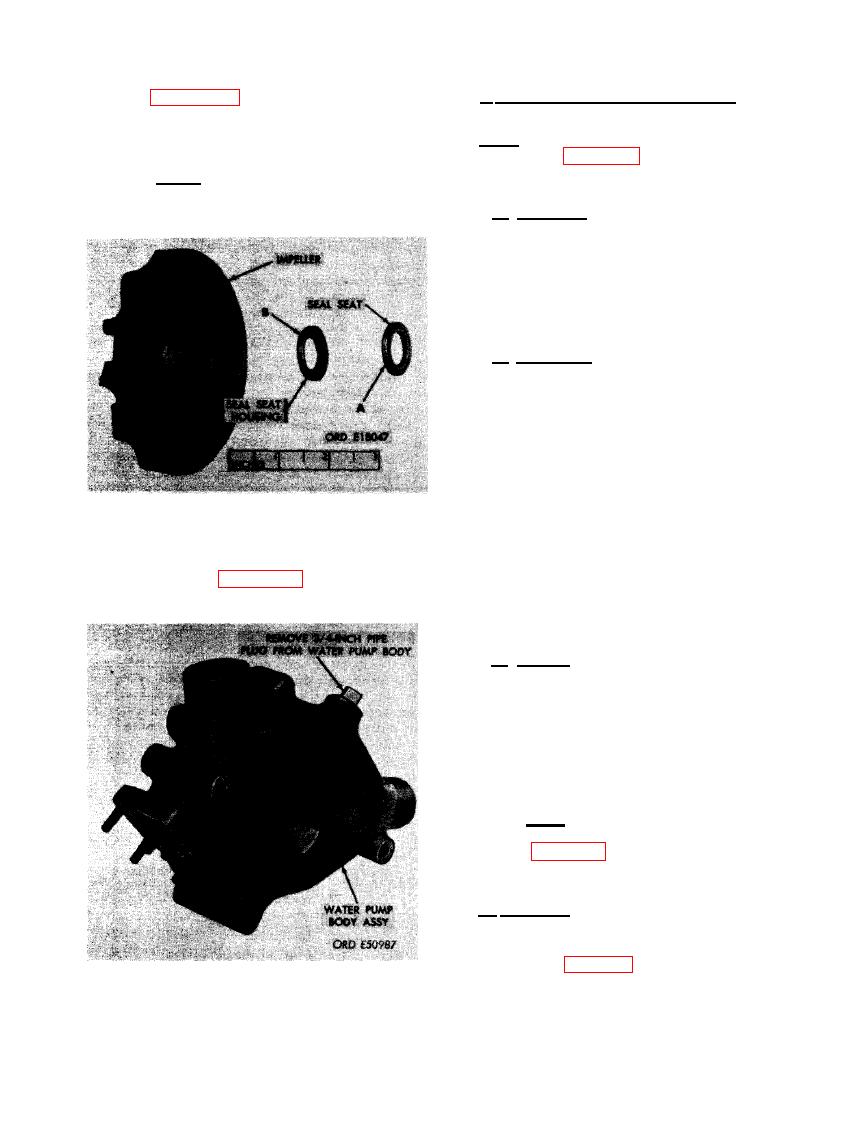
FIGURE 126. REMOVING PIPE PLUG FROM WATER PUMP BODY ASSEMBLY. |
|
||
| ||||||||||
|
|
 c. Cleaning, Inspection, and Repair.
(9) Figure 125. (A) Remove water pump
seal seat from impeller. (B) Remove
water pump seal seat housing from
Note. The key letters shown below in paren-
water pump impeller.
theses refer to figure 127 except where other-
wise indicated.
Note. The grooved surface on seal
seat faces the seal seat housing when
properly assembled.
(1) Cleaning. Clean all water pump parts
thoroughly with dry- cleaning solvent or
mineral spirits paint thinner. Clean
scale deposits from inside body assem-
bly (J) and impeller (K) using a scraper.
Remove heavy grease deposits from
pulley (B), housing (M), and body (J-3).
Dry all parts with compressed air.
(2) Inspection. Inspect water pump body as-
sembly (J) for cracks, damaged gasket
surfaces, and damaged studs (J- 1, J-2,
and J-5). Replace body when cracked.
Inspect water pump housing (M), for
cracks and damaged bearing bore hole
or damaged mating gasket surfaces.
Replace housing when cracked or dam-
aged. Inspect water pump impeller (K)
for broken impeller blades and heavy
scale deposits or damaged drive shaft
WATER PUMP SEAL SEAT HOUSING
bore. Replace impeller when broken,
AND SEAL SEAT.
cracked, or unserviceable. Inspect
water pump pulley (B) for cracks and
(10) Refer to figure 126 and remove pipe
damage. Replace pulley when broken or
plug from water pump body.
cracked. Discard water pump drive
shaft (C), seal (F), impeller seal seat
housing (G), and seal seat (L).
(3) Repair. Remove burs on mating gasket
surfaces of body assembly (J) and hous-
ing (M) using a fine mili file. Replace
damaged studs (J- 1, J-2, and J-5) in
body assembly. Repair damaged threads
in body assembly (J) and pulley (B)
using a worn tap. Replace body assembly
when threads are severly damaged or
stripped.
Note. Oversize studs are available for
the water pump body assembly. Refer
to Table III or to TM 9-2815-204-35P
for stud replacement.
d. Assembly. Assemble the water pump as-
sembly as follows.
(1) Refer to figure 126 and reverse the in-
FIGURE 126. REMOVING PIPE PLUG FROM
structions to install 3/4-inch pipe plug
WATER PUMP BODY ASSEMBLY.
in water pump body assembly.
97
|
|
Privacy Statement - Press Release - Copyright Information. - Contact Us |
