 |
|||
|
|
|||
|
Page Title:
Section VIII. LOW- AND INTERMEDIATE-RANGE CLUTCH SPACER ASSEMBLY-REPAIR |
|
||
| ||||||||||
|
|
 TM 9-2520-249-34&P
Section VIII. LOW- AND INTERMEDIATE-RANGE CLUTCH
SPACER ASSEMBLY-REPAIR
7-46. Inspection and Repair
Refer to paragraph 5-3 for inspection and repair
Low- and intermediate-range clutch spacer assembly
recommendations.
(36) separates the low-range (41 and 42) and the
intermediate-range (27, 28, 33, and 34) clutch disks.
7-47. Repair Standards
Eight pins (38) are pressed through spacer (37) to
anchor the external-tanged clutch disks (27, 33 and 41).
repair standards.
Refer to paragraph 2-7.
Do not remove pins (38) from spacer (37) except for
a. If pins (38) were removed from spacer (37),
replacement.
install new ones.
7-45. Cleaning
b. Install new pins (38) into shallow side of
Refer to paragraph 5-2 for cleaning recommendations.
spacer (37). Press each pin in until it projects 0.900
inch above the highest surface of the spacer.
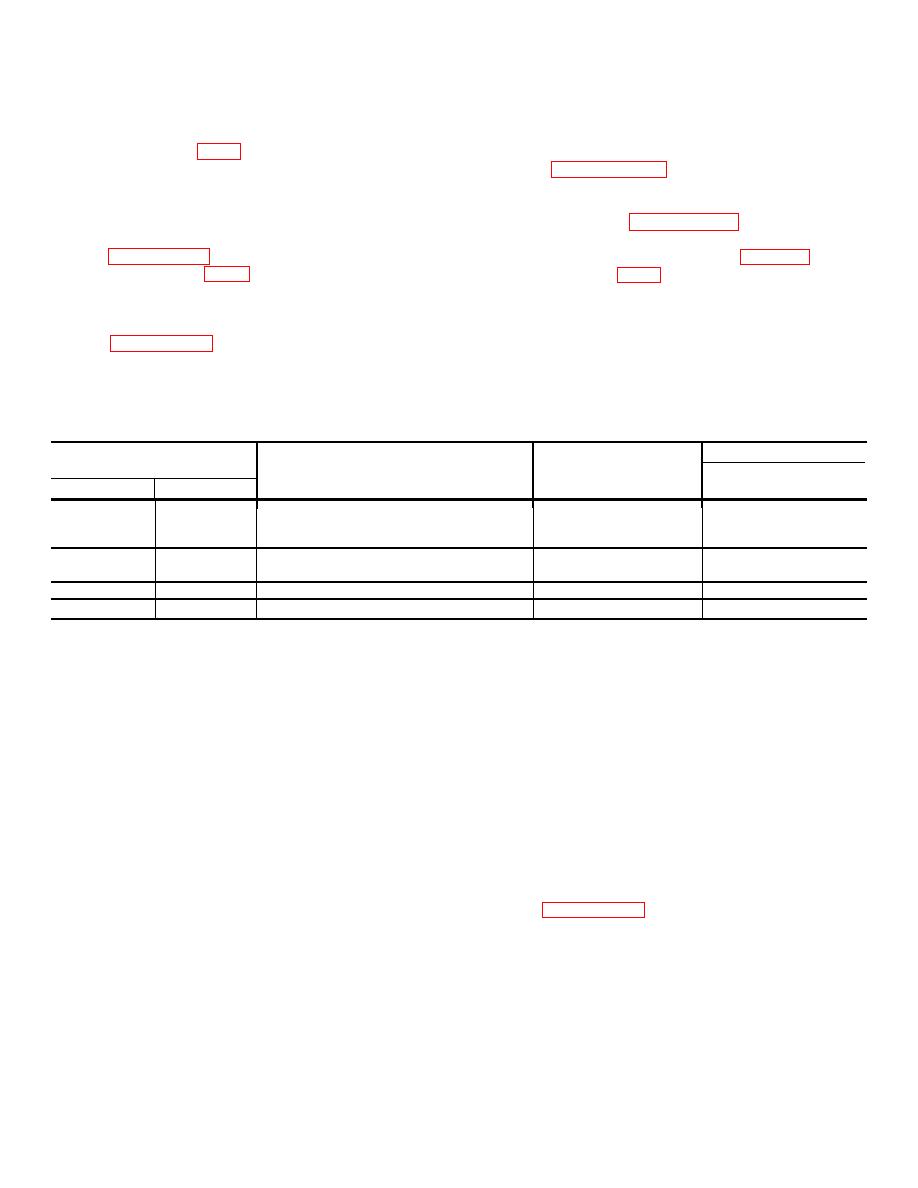
Table 7-7. Repair Standards (Low-, Intermediate-range Clutch Spacer)
Wear limit
Reference
Size and fit
DS/GS
Foldout
Item
Point of measurement
of new parts
maintenance
4
27a,
Thickness of disk..................................
0.1166 to 0.1226
*
33a
4
28a.
Thickness of disk..................................
0.1580 to 0.1630
0.1480
34a
4
41a
Thickness of disk..................................
0.1166 to 0.1226
*
4
42a
Thickness of disk................................. .
0.1580 to 0.1630
0.1480
*Replace when worn beyond new dimensions.
Section IX. TEFLON SEALRINGS AND EXPANDERS-REPAIR
7-51.
Removal
7-49. Description
Teflon sealrings have better wear characteristics, but
a. Insert a thin bladed tool (such as shim
are less elastic than rubber-type rings. They require an
stock) into the sealring groove, and work one edge of
expander in most cases where the endless sealring is
the sealring out where it can be grasped by the fingers.
used. The expander is a thin wavy strip of metal with
WARNING
open ends and goes into the bottom of the groove
Do not dispose of Teflon sealrings by
between the sealring and the piston.
burning. Toxic gases are produced.
7-50. Instructions Apply to All Clutches
b. Remove the sealring expander. Clean the
a. These instructions apply to the installation
groove thoroughly, and make sure there are no burs or
of Teflon sealrings and their expanders into all pistons
rough spots in the groove sides or bottom.
or other components, regardless of the clutch applied by
7-52. Cleaning
the piston using these rings.
Refer to paragraph 5-2 for cleaning recommendations.
b. All overhaul sections in this chapter which
involve sealrings and expanders are referenced to this
section for removal and installation.
7-12
|
|
Privacy Statement - Press Release - Copyright Information. - Contact Us |